Typing Smarter with Typinator — Text Expansion for Developers and AI Workflows
Table of Contents
The Mac Power-User Trio
There is a small category of Mac utility that sits quietly in the menu bar and quietly makes everything faster. Three of them I use every day:
- Typinator — text expansion. Type a short code, get a full block of text.
- PopChar — character browser. Every Unicode glyph, symbol, and special character in one searchable panel. No more hunting through Emoji & Symbols.
- KeyCue — keyboard shortcut overlay. Hold ⌘ in any app and get a full overlay of every available shortcut.
All three are from Ergonis Software. None of them are free, all of them are worth it. They’re the kind of tools that feel optional until you’ve used them for a week, after which not having them feels like typing with oven mitts.
Typinator is the one with the most surface area. Text expansion has existed on the Mac for a long time — macOS has a built-in version, Alfred has it, Raycast has it — but Typinator’s feature set is deeper: regex matching, AppleScript and shell script expansions, multi-line text with HTML support, conditional logic, per-app restrictions, and iCloud-synced sets. If text expansion is part of your workflow, Typinator is the serious version of it.
Why Command-Line Work Changes the Equation
Working in a GUI, text expansion is a convenience — save a few keystrokes on email signatures and common phrases. Working at the command line and in AI tools, it becomes something closer to a force multiplier.
The shift to Claude Code as a primary working tool has changed how much structured text I type per day. Claude Code is a terminal-based AI assistant. You interact with it by typing. There is no toolbar, no button to click, no pre-built template library in the UI. If you want to send Claude a well-structured prompt — a consistent briefing format, a standard analysis template, a multi-part research task — you type it, every time, or you paste it from somewhere.
That friction adds up. Worse, it makes you lazy: instead of taking the ten seconds to write a properly structured prompt, you dash something off and get a lower-quality result. Text expansion solves this by making the well-structured version faster than the lazy version.
The Claude Prompts Set
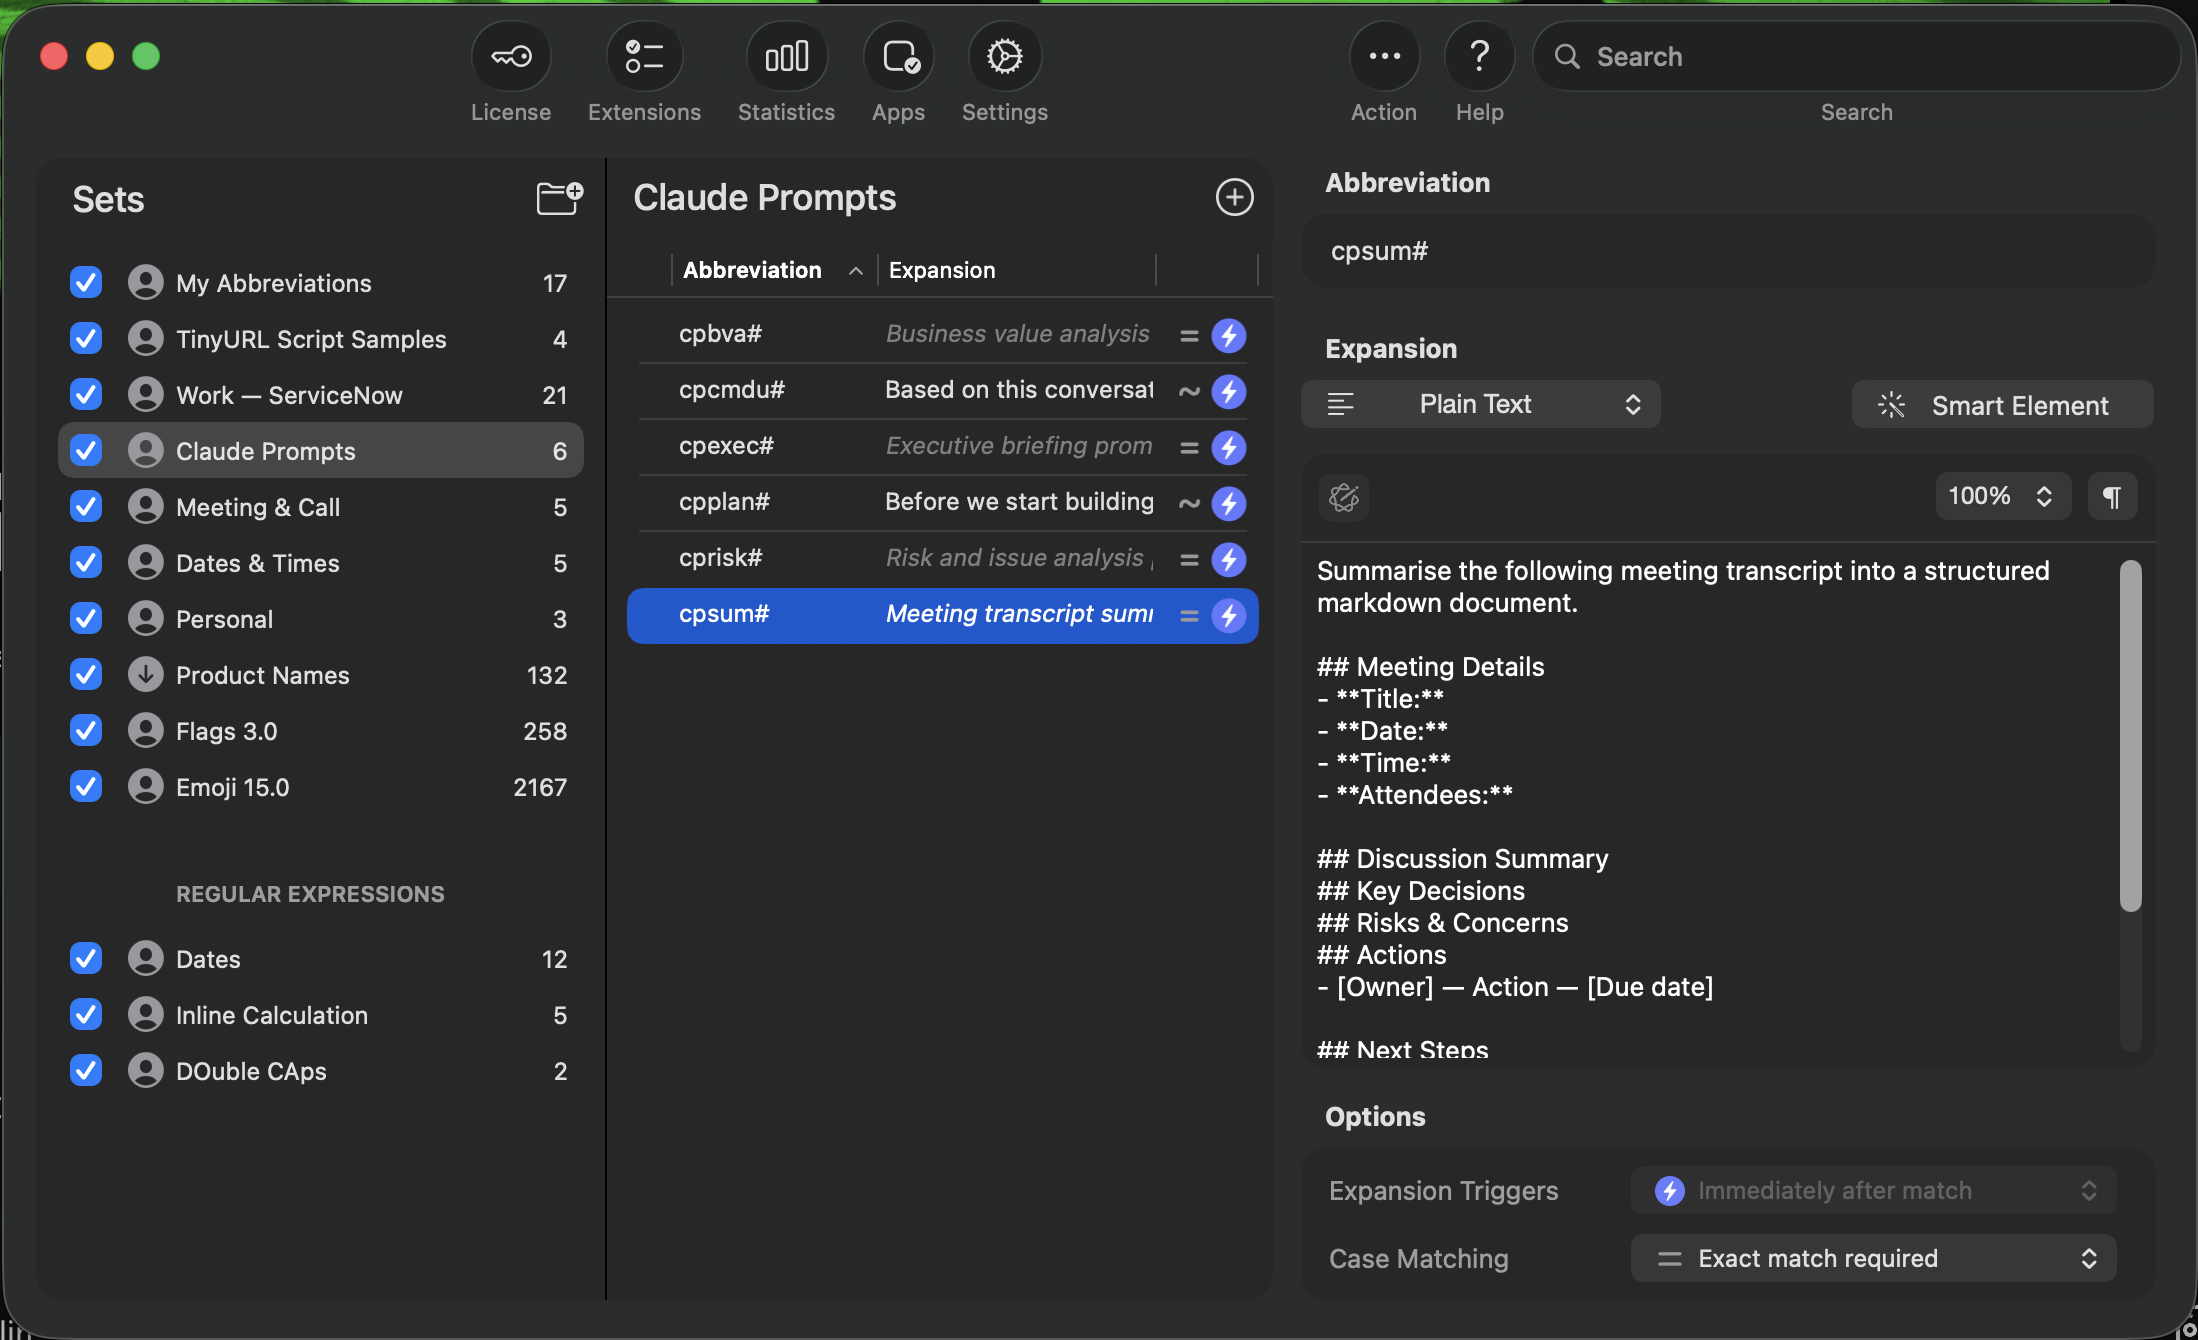
The setup is a dedicated Typinator set called Claude Prompts — a library of structured AI prompts behind short abbreviation codes. Each code follows a pattern: cp (Claude Prompt) + a short descriptor + # as the trigger character. The # suffix means abbreviations only fire intentionally — they don’t conflict with normal typing.
The set shown in the screenshot above:
| Abbreviation | Expands to |
|---|---|
cpbva# |
Business value analysis prompt |
cpcmdu# |
Context-continuation prompt (based on this conversation…) |
cpsec# |
Executive briefing / security analysis prompt |
cpplan# |
Pre-build planning prompt (before we start building…) |
cprisk# |
Risk and issue analysis |
cpsum# |
Meeting transcript summary template |
For example, cpsum# expands to:
Summarise the following meeting transcript into a structured markdown document.

## Meeting Details
- **Title:**
- **Date:**
- **Time:**
- **Attendees:**

## Discussion Summary
## Key Decisions
## Risks & Concerns
## Actions
- [Owner] — Action — [Due date]

## Next Steps
Type cpsum# in the terminal, paste a transcript, and send. Every time — same structure, same sections, consistent output.
Beyond AI Prompts — Where Else Text Expansion Pays Off
Once the habit is there, you start noticing every piece of text you type more than once. That’s the real value of Typinator: not the specific set of abbreviations, but the discipline of turning repetitive text into a trigger. Here are the other sets worth building.
Assembler Code — KickAssembler Boilerplate
6502 assembler in KickAssembler involves a lot of structural boilerplate that never changes: raster interrupt setup, KERNAL memory configuration, sprite enable sequences, standard macro includes. This is exactly the kind of text that kills flow — you know what you need, you’ve written it dozens of times, and you’re pausing to type it from memory again.
The abbreviation scheme uses ka (KickAssembler) as the prefix. Here are the ones that earn their place, drawn directly from the DarkZone demo source code.
kaheader# — Project file header. Every main .asm file starts with one.
/*-=-=-=-=-=-=-=-=-=-=-=-=-=-=-=-=-=-=-=-=-=-=-=-=-=-=-=-=-=-=-=-=-=-=-=-=-=-=-
| Project:
| Context:
| Code:
| Graphics:
| Music:
-=-=-=-=-=-=-=-=-=-=-=-=-=-=-=-=-=-=-=-=-=-=-=-=-=-=-=-=-=-=-=-=-=-=-=-=-=-=-*/
kastart# — Full program bootstrap: BasicUpstart2, SEI, memory config, border/background clear, CLI. The sequence every C64 intro opens with.
BasicUpstart2(start)

* = $0900 "Main Program"

start: {
    sei
    lda #$35        // Bank out KERNAL and BASIC
    sta $01

    lda #0          // Black border and background
    sta $d020
    sta $d021

    // --- init here ---

    cli
}
kazp# — Zero page register aliases. The r0–r9 convention used across KickAssembler demos for temporary 16-bit pointers.
.const r0  = $02
.const r1  = $04
.const r2  = $06
.const r3  = $08
.const r4  = $0a
.const r5  = $0c
.const r6  = $0e
.const r7  = $10
.const r8  = $12
.const r9  = $14
kavic# — VIC-II bank and memory layout variables. Adjust vic_bank_bitmap for your layout.
.var vic_bank_bitmap                    = 2
.var screen_memory_bitmap_offset        = $0c00
.var bitmap_address_bitmap_offset       = $2000
.var custom_font_mem_bitmap_offset      = $0800

.var vic_base_bitmap                    = $4000 * vic_bank_bitmap
.var screen_memory_bitmap               = screen_memory_bitmap_offset + vic_base_bitmap
.var bitmap_address_bitmap              = bitmap_address_bitmap_offset + vic_base_bitmap
.var custom_font_mem_bitmap             = custom_font_mem_bitmap_offset + vic_base_bitmap
kairq# — Raster IRQ setup: CIA disabled, vector pointed at handler, raster line set, interrupt acknowledged.
.macro SetupIRQ(IRQaddr, IRQline) {
    lda #$7f        // Disable CIA IRQs
    sta $dc0d
    sta $dd0d

    lda #<IRQaddr   // Install raster IRQ vector
    ldx #>IRQaddr
    sta $fffe
    stx $ffff

    lda #$01        // Enable raster IRQs
    sta $d01a
    lda #IRQline
    sta $d012

    lda $d011       // Clear raster line bit 8
    and #$7f
    sta $d011

    asl $d019       // Ack any pending raster interrupt
    bit $dc0d       // Clear CIA interrupt flags
    bit $dd0d
}
kairqhandler# — IRQ handler stub using the irq_start / irq_end convention from the macro library.
irq0: {
    irq_start(end)

    inc framecount
    jsr music.play

    irq_end(irq1, SCANLINE_1)
end:
    rti
}

irq1: {
    irq_start(end)

    // --- raster effects here ---

    irq_end(irq0, SCANLINE_0)
end:
    rti
}
kastable# — Double-IRQ for stable raster. Two-interrupt technique to land at a known cycle position on the raster line.
.macro double_irq(end, stableIRQ) {
    irq_start(end)

    lda #<stableIRQ
    ldx #>stableIRQ
    sta $fffe
    stx $ffff
    inc $d012           // Next raster line
    asl $d019           // Ack interrupt
    tsx                 // Save stack pointer
    cli
    nop
    nop
    nop
    nop
    nop
    nop
    nop
}
kasid# — Load a SID file and wire up init and play calls.
.var music = LoadSid("resources/tune.sid")

* = music.location "SID Music"
.fill music.size, music.getData(i)

// In init:
    lda #music.startSong - 1
    jsr music.init

// In IRQ:
    jsr music.play
kasprites# — Sprite enable, pointer assignment, and colour setup for all 8 sprites.
// Enable all sprites
lda #%11111111
sta $d015

// Set sprite pointers (screen_memory + $3f8)
.var sptr = screen_memory_bitmap + $3f8
.for (var i = 0; i < 8; i++) {
    lda #SPRITE_BASE_FRAME + i
    sta sptr + i
}

// Set sprite colours
.for (var i = 0; i < 8; i++) {
    lda #WHITE
    sta $d027 + i
}

// Sprite X/Y positions
lda #SPRITE_X_LO
sta $d000       // Sprite 0 X
lda #SPRITE_Y
sta $d001       // Sprite 0 Y
kakoala# — Load a Koala bitmap and place screen RAM and colour RAM data.
.var picture = LoadBinary("bitmaps/image.kla", BF_KOALA)

* = bitmap_address_bitmap "Bitmap"
.fill picture.getBitmapSize(), picture.getBitmap(i)

* = screen_memory_bitmap "Screen RAM"
.fill picture.getScreenRamSize(), picture.getScreenRam(i)

* = $d800 "Colour RAM"
.fill picture.getColorRamSize(), picture.getColorRam(i)
kaexo# — Exomizer plugin setup and decrunch call for inline crunching via kickass-cruncher-plugins.
.plugin "se.triad.kickass.CruncherPlugins"

.const EXO_LITERAL_SEQUENCES_USED = true
.const DISABLE_EXOMIZER_CACHE     = true
.const EXO_ZP_BASE                = $02
.const EXO_DECRUNCH_TABLE         = $0200

#import "code/exomizer_decruncher.asm"

// To crunch data inline:
crunchedData:
    .lz4 { .fill dataSize, dataSource(i) }

// To decrunch at runtime:
    :EXO_DECRUNCH(crunchedData)
kafill# — Fill 1KB of screen RAM with a value using the unrolled page-loop pattern.
.macro FillScreenMemory(address, value) {
    ldx #$00
    lda #value
!loop:
    sta address,       x
    sta address + $100,x
    sta address + $200,x
    dex
    bne !loop-
    ldx #$e8
!loop:
    sta address + $2ff,x
    dex
    bne !loop-
}
kaloop# — Standard main loop skeleton with per-frame JSR calls and a raster wait.
framecount: .byte 0

main_loop:
    // Wait for raster line 0 (top of frame)
!wait:
    lda $d012
    bne !wait-

    jsr update
    jsr animate_sprites

    jmp main_loop
kaimport# — Standard import block for macros and common code modules.
#import "macros/macros.asm"
#import "code/irq_handlers.asm"
#import "code/scroller.asm"
The pattern across all of these is the same as the AI prompts: ka prefix, descriptor, # to fire. kairq# at the top of a new interrupt file, kazp# to stub out the zero page, kasid# when wiring up music. The boilerplate is always the same — the only thing that changes is the specifics you fill in.
Claude Code — Structured Prompts for the CLI
Claude Code responds better to context-rich prompts, but writing a thorough context block every time is friction. A Claude Code set (separate from the general AI prompts set) handles the CLI-specific ones:
| Abbreviation | Expands to |
|---|---|
ccctx# |
Context block: codebase overview, current task, what’s already been tried |
ccrev# |
Code review request: check for bugs, edge cases, security, and style |
cctest# |
Test writing brief: what to test, what not to mock, format expected |
ccref# |
Refactor brief: goals, constraints, what must not change |
ccdoc# |
Documentation request: generate inline comments + README section |
cccm# |
CLAUDE.md update prompt — see below |
These fire directly in the terminal. Type ccrev# before pasting a function you want reviewed, and Claude gets a structured request rather than a bare code dump.
CLAUDE.md Files — Project Context Bootstrapping
CLAUDE.md is the file Claude Code reads at the start of every session — project context, conventions, constraints, anything Claude needs to know before touching the code. Writing a good CLAUDE.md from scratch each time is slow; using a template expansion makes it five minutes of fill-in-the-blanks.
cccm# (or a dedicated claudemd# abbreviation) expands to a full CLAUDE.md skeleton:
# Project: [Name]

## Overview
[One paragraph: what this project is, what it does, who it's for]

## Architecture
[Key files and what they do]

## Conventions
- Language / framework versions:
- Naming conventions:
- File structure:
- Testing approach:

## What NOT to do
- [Patterns to avoid]
- [Known footguns]

## Current Focus
[What we're actively working on right now]

## Build & Run
[Commands to build, test, and run the project]
Every new project gets a consistent CLAUDE.md in seconds. Claude’s responses are better for it, and the file doubles as useful onboarding documentation.
Documentation
Technical writing involves a lot of repeated structural patterns — section headers, tables, admonition blocks, API endpoint documentation. A Docs set handles the common ones:
| Abbreviation | Expands to |
|---|---|
docapi# |
API endpoint doc block: method, path, parameters, request/response examples |
docnote# |
Note/callout block in markdown (> **Note:** …) |
docwarn# |
Warning block |
doctbl# |
Markdown table scaffold with header row and two data rows |
docstep# |
Numbered step structure: prerequisites, steps 1–N, verification |
docchangelog# |
Changelog entry: version, date, added/changed/fixed/removed sections |
The table scaffold alone (doctbl#) saves more time than it sounds — markdown table syntax is just annoying enough to slow you down every time.
Email is the most obvious text expansion use case, and the one most people already know about. Still worth mentioning because the same structured-prefix approach applies:
| Abbreviation | Expands to |
|---|---|
emfollow# |
Follow-up email after a meeting — agenda summary + actions + next steps |
emintro# |
Introduction email template — who you are, why you’re reaching out, ask |
emesc# |
Escalation email — situation, impact, what’s needed, timeline |
emoof# |
Out of office message |
emsig# |
Full email signature block |
emty# |
Thank you email after meeting or proposal |
The escalation and follow-up ones are the high-value ones. When something needs to go to a senior stakeholder quickly, having a clean template means the message is well-structured even when you’re writing it under pressure.
Personal and Product Names
Typinator has built-in sets for this, but a custom one is worth maintaining for anything with awkward capitalisation, long strings, or special characters:
| Abbreviation | Expands to |
|---|---|
sn# |
ServiceNow |
snai# |
ServiceNow AI Platform |
jss# |
Full name — Jørgen Skogstad (including the ø) |
dzno# |
DarkZone |
abn# |
Company ABN / business registration number |
addr# |
Full postal address |
mob# |
Mobile number |
The special character one (jss# → Jørgen) is a particular relief — ø is three keystrokes on a non-Norwegian keyboard. Product names with specific capitalisation (ServiceNow, not Servicenow or service now) are another: one abbreviation and it’s always right.
Setting It Up
1. Install Typinator — available from the Ergonis website or SetApp. SetApp is worth considering if you use other Mac utilities — Typinator is included in the subscription.
2. Create a set for Claude prompts — in Typinator, click the + button at the bottom of the Sets panel and name it something like “Claude Prompts”. Sets can be enabled or disabled globally or per-app; keeping AI prompts in their own set makes them easy to manage.
3. Add abbreviations — click + in the middle panel to add an entry. Set the abbreviation (e.g. cpsum#) and paste the full prompt into the expansion field. For multi-line prompts, the expansion type should be Plain Text — this preserves line breaks and markdown formatting exactly as typed.
4. Choose your trigger character — the # suffix is a deliberate convention. It means the abbreviation only fires when you type the full code followed by #, so cpsum mid-sentence doesn’t accidentally trigger. Typinator also supports triggering on space, return, or immediately after match — # (or any character you’d never type mid-word) is the most intentional.
5. Test — open a terminal, type cpsum# and watch it expand. In Claude Code, the expanded text lands directly into the prompt input.
Where It Fits in the Workflow
The intended use is the terminal — typing into Claude Code, constructing prompts before sending, or building out multi-step task descriptions. But because Typinator works system-wide, the same prompt library is also available in a browser (Claude.ai), in Obsidian notes, in Slack, or anywhere else text is typed.
The screenshot shows the expansion trigger set to “Immediately after match” with # as the suffix. That combination means no extra keystrokes — type the code, type #, expansion happens. No confirmation, no popup.
The bigger productivity gain is less about speed and more about consistency. When cpsum# always produces the same template, Claude’s output is structured the same way every time. Summaries are easier to scan, action items are always in the same place, and the output can be dropped straight into a document or ticket without reformatting.
Related: Auto-Renaming Screenshots with Claude Code — another piece of the keyboard-first, automation-heavy workflow.